Connect Kempower to KotiCharge
Follow these detailed instructions to configure your Kempower T-series DC charger for the KotiCharge network using its built-in web interface.
Change your network settings
You need to change the network settings of your computer to match the charge point's local IP network.
- Click on the Internet/Network icon in the bottom-right corner of your computer screen and open Network & Internet Settings.
- Select Change adapter options.
- Find your Ethernet adapter, right-click on it, and select Properties.
- Find Internet Protocol Version 4 (TCP/IPv4), select it, and click Properties.
Select "Use the following IP addresses" and enter the following values exactly:
- IP address:
192.168.100.10 - Subnet Mask:
255.255.255.0
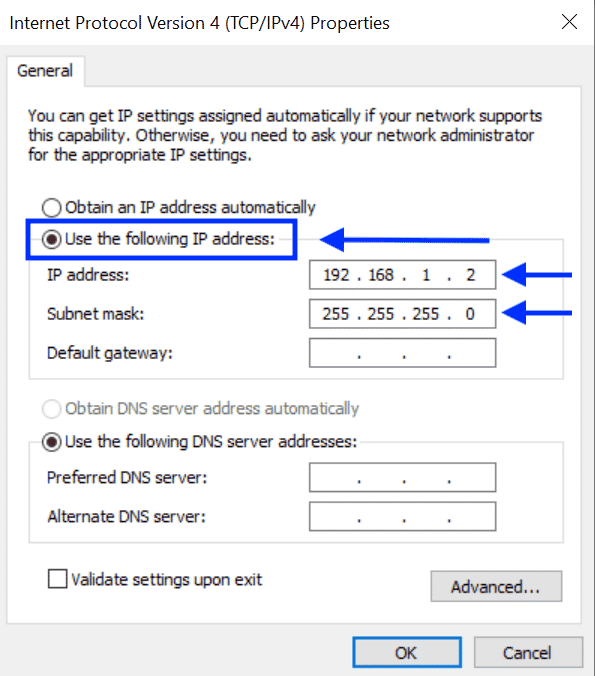
Click "OK" and close the window.
Prepare charge point connection
Safety First!
Disconnect the charge point from the AC supply and wait 2 minutes before opening any covers.
- Open the T-series front cover.
- Connect an ethernet cable to the RJ45 connector inside.
- Power on the T-series charge point.
- Connect the other end of the ethernet cable to your PC.
Log in to the WebUI
When the charge point is up and running, open a web browser on your PC and navigate to https://192.168.100.200:8443
Note: Your web browser will likely show a warning about security certificates. Click "Advanced" and "Proceed to 192.168.100.200 (unsafe)".
Security Key Login
The security key text file is delivered separately with the charger. Open the text file and copy/paste the entire contents (including beginning and ending headers) into the login dialog.
Disclaimer: Do not share this key publicly!
Click the "Login" button.
Configure Network and OCPP
Network Settings:
- Click on "Network" on the left side menu.
- If WiFi is enabled, you need to disable it.
- Enable Legacy USB Modem. (No need to write anything to the SIM card ICCID field).
OCPP Settings:
Navigate to "Settings" on the right side menu, and click on "Connectivity & Integrations".
Enable "OCPP 1.6 backend" using the toggle switch and enter the following values:
- Endpoint URL:
wss://ocpp.koticharge.link/ - Charge point identity: Enter the serial number of your charge point.
Click "Save and Sync".
Call KotiCharge for Testing
Call KotiCharge to inform us of your charger's ID so we can activate it in our system and perform a charging test.
Charger setup is only complete once the charging test has been performed successfully. Please do not leave the site before that.